Showing posts with label Project. Show all posts

Monday, February 13, 2012

My Collossal, Unnamed Spaceship

The pictures of some of my creations included in my last entry sparked some interest.  So, the following are some more pictures of the large space ship I created back in high school (10 years agon now, wow!).  What is funny is that I could never come up for a name for this thing, to this day I think of it as "the big ship"; no name I could come up with ever seemed right.  Any suggestions?

Statistics:
Length: 5.1 feet long
Width: 3.1 feet at widest point
Average Width: 1.5 feet
Height: 2.25 feet at talles point

Some "Big Picture" shots:

I had always wanted to build something big enough that it
could include a monorail.  This was it.

This picture was actually taken from on my roof looking through
the window.  Model was too big to move.

This front part housed the hanger, labs, bridge and officer's cabins.

This middle section was crew quarters (the yellow section) and
connecting walkway.

The following pictures show how the model opened so that you could access the inside.  My goal was to make it 100% playable (a requirement for all my MOCs) which meant 100% access.  I succeeded. 

This shows everything opened and all the removable floors removed.
The crew quarters.
The hallway, the crew quarters were accessed via hatches in the floor
(you can see the red in the floor, those are them)
You can see the monorail dock and the rear access door here
And now a few detailed pictures of the interior.

The hanger, it was so big I could (and did) stick my head in it.

The engine room with the reactor front and center.
The mechanical room.
The greenhouse.
The first floor of the medical wing.  The hatch to the right accessed the
mechanical room and crew quarters.
Top floor of medical wing.  This was before sites like bricklink so I had to use
printed tiles for lack of plain ones.
Inside view of the hall looking from the front to the rear of the ship.
Crew quarters, 3 stories tall, sleeping was on the left and workout room
was on the right.
Officers quarters off the bridge.
The bridge and stairwell to the officer's cabins.
The model was very intricate.  Working pathways for minifigures existed throughout.  Their was a large working elevator in the hanger as well as the working monorail.  To date it is the biggest model I have ever done. 

A couple of final shots.


Wednesday, January 4, 2012

Perfecting 4184 The Black Pearl

When the first images of this set appeared the response from the AFOL community was largely disappointment bordering on disgust. 


I personally felt, and still feel, that this was unfair.  To Lego's credit, with the parameters they had to operate in, I thought they did a pretty good job.  There is a front deck (unlike the Brickbeard's Bounty) and the rear cabin is enclosed (unlike the Queen Anne's Revenge).  There are three masts and the center one has three sails (unlike any of the older ships).  On top of that you get some exclusive minifigures, if that floats your boat (pun completely intended) or could get it even cheaper if you were willing to pass on them (I bought mine on Bricklink for 40% off sans figs).  Furthermore, if you take into account inflation this set costs the same amount in today's dollars as the original good guy boat: 1989's Caribbean Clipper. 


Put those two side by side and I wager you will begin to think that maybe the Pearl isn't so bad after all!  For the price you pay I think you get an excellent model.  Thank you your honor, I rest my case!

However, if you compare the Pearl to the ship as seen in the movies, or even the Lego video game, even I will admit that it is not at all a faithful recreation.  The cost of the exclusive parts for the minifigures and the pressure to maintain the $100 price point meant something had to give.  Accordingly, movie accuracy was sacrificed. 


So I set out to see if, without adding hull sections, I could make the model more movie accurate. Along the way I added a few details that I think all Lego ships should have and the result was fantastic.  Below are some pictures illustrating what I did. 

I completely redid the back.  I added more windows and changed their color as well as making the entire shape more accurate by cantalevering out the cabin and adding the sloped roof.  The ship in the movie also had decorative supports underneath the windows which I mimicked using minifigure megaphones.


I added a working mechanism for the anchor to the front, extended the deck, added stairs up to the deck and installed hatches to access the hold below which I sealed off. 

The middle section was finalized by adding a walkway from the front to the back which tied into the stairs that came as part of the original model.  You can also see the cantalevered windows in the back and the redone shape of the top deck.

Just like when I modified the Queen Anne's Revenge I also made instructions for how to do these modifications so I will be able to recreate them in the future.  Overall I really liked the improvements and felt that they make a great ship even better.

Monday, November 7, 2011

Resurrecting the Skull's Eye Part 5: Completion


Well it is done; and I could not be more pleased!  A few painted pieces, 4 glorious hours of building and I have a gorgeous Skull's Eye Schooner added to my fleet. 

Ok the big question I know you all are asking is: did he pull it off?  Did he do the project for less than the original MSRP?  I am happy to announce the answer is yes.  Including shipping the grand total for the project was $116.53 in 2011 dollars.  The really cool part is that if you account for inflation the MSRP for the Skull's Eye today would be in the $190s so I really did get a deal. 

Two quick notes, however, on the cost in case you are considering doing this yourself.  As I mentioned earlier I had about 30% of the parts I needed already and the cost for those pieces is not included in this total (my guess is it would have added about $20 to the project).  Additionally I had extra minifigs lying around that I used as well as all the different parts/alterations I have described.  If you went for pure authenticity (all the correct minifigures and no alternate or modified pieces including the sails) I do not think this would end up being any cheaper than buying a complete model on eBay or Bricklink.  If, however, you are of a similar mind to me and bending the rules of purism does not bother you the Skull's Eye can be yours for much cheaper than any other option.

In addition to the actual model I also took a little bit of creative liberty and added walkways on either side of the cannons creating a cannon well along with a way for figures to traverse from the front to the back of the ship.  This is a feature included on 6285 Black Seas Barracuda and I felt it was sorely lacking on the Skull's Eye. 

In the wake of this success I have decided to up the ante and try to resurrect the remaining 5 ships that I still don't have in my fleet in one fell swoop.  I have already sorted out the parts I have for each one and will make the big purchase when my budget recovers from this project.  Once complete I will have every ship produced by Lego!

For those of you actually interested in trying this I will be posting a detailed walk through of how to make your own Lego sails soon (I am about 50% done with that entry) as well as PDFs of my tracings.

Feel free to email me with any questions.  A few pictures of the final product: 


The green flags are painted.  You would never have known if I had not told you!  You can also see the railing and walkway I added.  

I painted the latticed window and the blue lantern bases.  The Jolly Roger is a sticker applied to a standard panel.

Friday, October 28, 2011

Resurrecting The Skull's Eye Part 4: Making The Sails

As I alluded to earlier if I had needed to buy the sails that would have been a deal breaker for this project. Whether on eBay or Bricklink the price for sails is obscene.  Painful as it is this makes perfect sense as sails are the ultimate exclusive part; each one is unique to its particular set alone.  Some shapes and sizes a shared but the design is particular to each ship.  With such a limited supply the cost is bound to be high. 

On most things I am a purist.  You will not find a single Megablock, Tyco or other cheap imitation piece in my collection.  However, as I mentioned earlier I am not opposed to changing the color of an official Lego piece (and am doing so on this project) and I am also not opposed to creating my own custom parts when I can do it at the same level of quality as Lego.  With the sails and flags I am in a unique position in that I have a fashion designer as a wife which gives me access to some expert knowledge and work as an engineer which gives me access to some fairly high end software, both of which I will put to good use.  I am certain I can make top quality replicas.

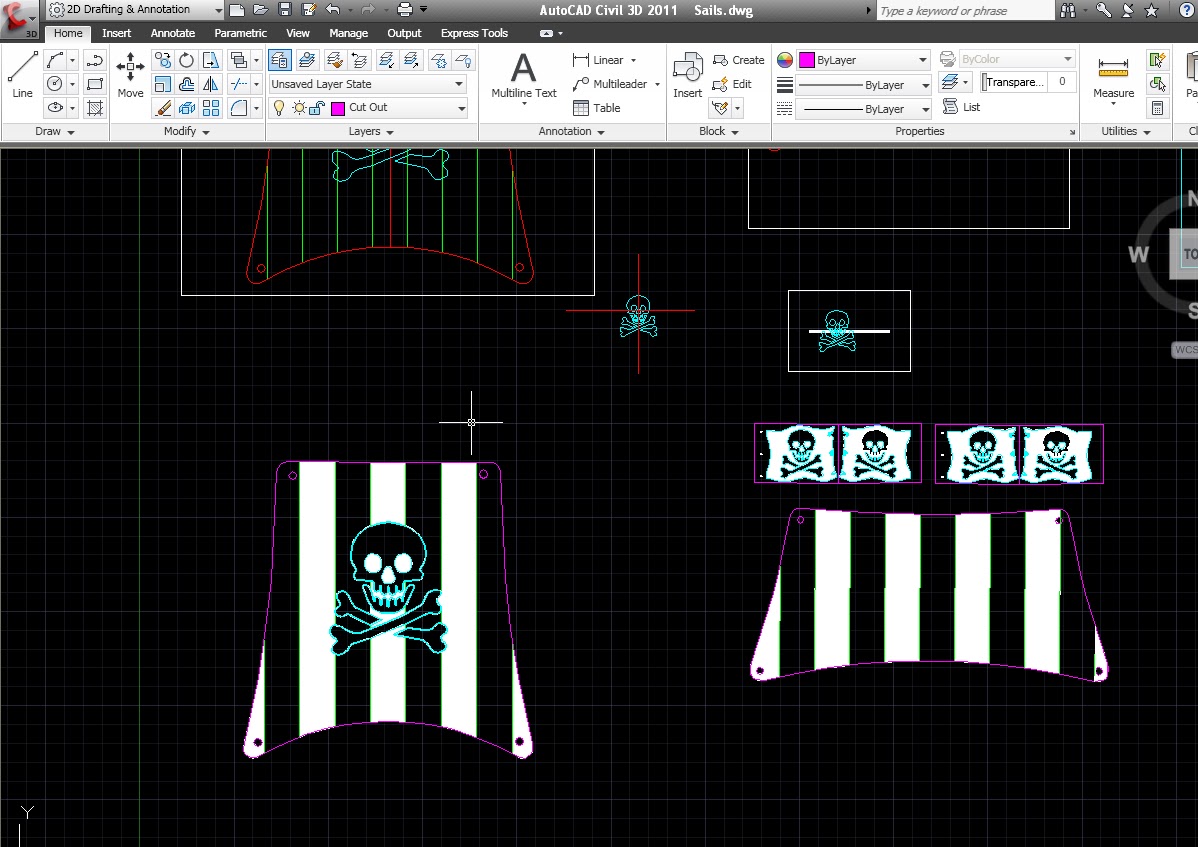
My first stop is http://www.classic-pirates.com/ and their excellent library of 1:1 scans of all the Lego sails from every ship Lego has produced.  After downloading those I import them into a computer aided drafting (CAD) program that I use for work.  I then painstakingly trace them down to the smallest detail saving the final product as a PDF.

Screen shot of sail tracing
Ok now for the material.  This is where my wife and her textile training comes in.  What is that mysterious not quite paper but not quite fabric material Lego sails are made of? The answer?   Artist's canvas.  Yes that material is the same stuff as those large canvases you see hanging in museums with all manner of wet media spread across them.  A quick stop at my local hobby shop and I have a pad of artist's canvas with more than enough sheets. 


I insert those sheets into my home printer and must confess that even I am taken aback by the perfection of the result.  Out of the machine come a set of sails indistinguishable from the originals for my soon to be constructed schooner.  Some quick work with my beloved bride's extra sharp scissors and I have a full set of sails for under $8.00!


For those of you interested in trying something like this project yourself I will post, in a later entry, detailed step by step instructions for how to make your own Lego sails from scratch as there are some particulars and pitfalls you should be aware of. 

The parts are here and after a little painting I have before me the final product, I will post final pictures, including the few modifications I did, as well as the final costs in my next entry. 

Thursday, October 20, 2011

Resurrecting the Skull's Eye Part 3: The Bricklink Purchases

I approach buying Legos on Bricklink like generals approach a war.  Making a large purchase (as I am about to do for my Skull's Eye project) is like storming an enemy's  beachhead; poor planning or execution will cost you... Dearly.  Ok so I exaggerate a little bit but the point holds.  With the plethora of stores hawking their plastic studded wares Bricklink can be overwhelming to those looking to pinch pennies as I am.  Here is how I do it. 

My Bricklink purchases are made after hours at work.  No, this is not because I am trying to hide my Lego addiction from an indignant spouse (my wonderful bride is the biggest supporter of my habit God bless her!).  It is because my work computer has 2 screens, and I am going to need them.  I open up no fewer than 8 windows (4 per screen to start) each to the homepage of Bricklink.  I then do a search for the 8 pieces that I think are going to be the most rare. 

Filling the carts
I start with the ones I have labeled as exclusive (as per my earlier blog entry) and then move into the mid-range pieces filling in however many remaining windows I have choosing the parts based on my past experience with their exclusivity. 

These become my 8 starting stores and I then search for my Wanted List in each one of them.  9 times out of 10, if I have done a good job of parsing out the pieces into the 3  categories, this will yield all of the parts I need being in the carts of these various stores.  If not then I find stores that have the missing ones until I have all of the parts accounted for.  Obviously the is a lot of overlap and by the time I have all the pieces accounted for my carts are swelling with repeats.  Thus begins the slashing (and why I want the 2 screens).  Like some sort of perverse reality show I begin eliminating repeats leaving only the most inexpensive offering for a given piece in the cart of it's respective store.  Along with the cold numerical considerations there is also a certain amount of judgement which must be employed at this stage.  Yes a given piece may be cheaper in store A but if that is the only piece that is cheaper and store B has that same piece for a mere few cents more then it is not worth the shipping to buy that single part from store A.  Often whole stores will get eliminated for this reason because even if I can save a couple of bucks on pieces it isn't worth the 7 or 8 dollars I would have to pay in shipping.  Judgement is also needed as it relates to the size of pieces.  Baseplates or other large specialty parts are going to require a larger box for shipment, so packing more small parts (even if they are a bit more expensive) in with the larger ones that are going to have to be shipped in a larger box anyway can potentially save you money somewhere else.  So really my technique is part science and part my gut instinct mixed with past experience. 

When it is all said and done this time around I am left with items in 6 stores and the sense that I have had a mind numbing out of body experience.  Bricklink does not have a lot of automated tools to assist me in my technique, I have to track which pieces are accounted for on my own as there is no online tool that lets you fill your wanted list with the cheapest option across multiple stores (at least not that I have found, if someone knows where this feature is please let me know!).  At the end of one of these crusades (which can take, on a project like this, multiple hours) my head is spinning and I am always wishing I had enough money to just order from the first stores that come to the top of the list.  But I have the parts I need and the supreme satisfaction of feeling like I have won a battle. 

Normally, completing my orders would usher in the time that would find me bouncing around with the anticipation of a child on Christmas Eve waiting for all the parts to come in so I can build the new set.  This time, however, I have a task to occupy my mind and hands: the sails. 

Monday, October 10, 2011

Ressurecting The Skull's Eye Part 1: Developing The Parts List

A key aspect of any resurrection project is understanding the different categories that a set's parts fall into.  There are three categories which, in my mind, describe each of the pieces in a set. 

The Basic Pieces
The Mid-Range Pieces
The Exclusive Pieces

The basic pieces are those that are common in both type and color.  A prime example of these are bricks and plates, the foundations of any set. 

These will be availible in almost any Bricklink store or lot of loose pieces on eBay.  On a resurrection project they are the parts you won't have to worry about finding or paying an arm and a leg for.   


The mid-range pieces are a little more difficult to find than the basic ones but are still fundamental to the set.  A great example of these types of parts are hinges.  Most Bricklink stores will have hinges, but there are so many differnt types and colors that the exact combination you need is often a bit harder to find and may not exist in a single store.  


The final category is the exclusive parts.  These are the ones that, whether in type, color or both, only came with a few sets and therfore there are less of them floating around.  Due to the limited supply the price for these parts goes up accordingly.  An example from the Skull's Eye is the compass. 
 
My approach to shopping for parts (which I will describe in detail in a later post when I get to that point) is to figure out where I am going to get all the exclusive parts and see how many of the pieces in the other 2 categories I can get from those stores.  Most of the time it is 95% of them or more depending on how many exclusive parts there are.  For now I need to figure out which parts are in which category.   

In the case of the Skull's Eye I identify the following pieces as being exclusive and for the following reasons:

1. The compass shown above (only availible in Pirate themed sets).
2. The printed 4x3 panel on the back of the ship (the piece is common but the printed skull and crossbones is exlusive to this set alone... already dreading the price on that one).
3. The green flags wich cover the cannon ports on the sides (a common piece but very rare in this color).
4. The blue palm tree top pieces that make up the bottom of the lanterns (I only know of one other set that these came with in that blue color: 6271 Imperial Flagship from 1992, my guess is they were included here because they had been overproduced for that earlier set).

Monday, October 3, 2011

It's a Go!

After having looked into it I have determined that trying to ressurrect the Skull's Eye is a reasonable project and am giving the project the green light!  I am in fact a little behind as I have already made the first purchase: the hull.

I knew going into this that the hull was going to be the most expensive part of the project.  Whenever I have a piece (or pieces) like that which are essential and exclusive to the set, I always check both Bricklink and eBay.  In this case it turned out that eBay won.  I found a seller offering the complete hull in excellent condition with free shipping for less than any of the stores on Bricklink.  As the hulls would have added substantially to the shipping cost of any Bricklink purchase this was a no brainer for me.  $35.00 later and I am off and running (or sailing as the case may be)!

The hull from the eBay purchase.
After getting the hull (which along with being essential commmits me to the project) my next stop was Peeron for the set inventory.  This past weekend I went through all of my spare parts to see what I had and develop the shopping list which will guide my decisions on how to get the pieces I need and form the basis of the future Bricklink purchases.  I was pleasantly suprised by how many of the parts I already had.  This is the beauty of some of these older sets, as Lego did not have as large a pool of pieces to draw from they had to make do by using the ones they had in creative ways.  This translates to sets containing a lot more of the basic pieces which are easy to come by.  I was delighted to find that I had about 30% of the pieces already spread throughout my bags and bins of "spare parts". 

With the hull on order and the shopping list in hand I am ready to tackle the next challenge: figuring out how I am going to get the pieces I need.    

Thursday, September 15, 2011

My Next Project?

I was 9 years old in 1993, and like most I don't have a lot of clear memories from that long ago.  Among the few that I do have is one that happened in the long defunct K-Mart store that used to be on the west side of the Indiana town I grew up in.  Not sure what brought us to that store as my mom almost never shopped there (the town’s Target was much closer to where we lived) but for whatever reason I ended up in the Lego aisle that day and can distinctly remember, with photographic clarity, holding 6286 Skull's Eye Schooner in my hands. 


At $126.50 in 1993 (which is equivalent to just shy of $200 today in 2011) this set was well beyond even the most remote chance of ever being added to my collection.  I dreamed of owning it there in the store and then put it from my mind to instead focus on the plethora of sets which were within the realm of possibility.  But as attested to by my razor sharp memory of holding that box, the Skull’s Eye lodged itself in my consciousness.   

Through the years I have kept an eye out for it.  I remember looking at auctions in the early days of eBay, and have also checked bricklink.com for it through the years.  After over a decade of this searching I can say with certainty that I am not the only one who has been haunted by that set as I have never, even if the model was incomplete, seen it sell for less than $200.00.  Still sealed I have seen it go for over $1000.  Its rarity is further demonstrated by the fact that I have never seen it assembled in person.  Whether in Lego stores, the Mall of America, store displays or friend's houses there a very few sets that I have not seen in person at least once, but the Skull’s Eye is one of them. 

The other day I was contemplating different Lego projects I could do.  Having recently scored some excellent eBay purchases which have added to the already fairly large stash of extra pieces from past Bricklink orders I have been feeling the itch to start a project.  As different options came to mind I suddenly had the thought "I wonder if it would be possible to resurrect the Skull's Eye?".  For those of you unfamiliar with the lingo to resurrect a set means that you purchase the raw pieces and assemble the needed collection of parts yourself rather than buying the set whole.  I have done this previously and found that, depending on which set you do this with, it is possible to sometimes obtain an old set for less than its original MSRP and it is almost always possible to do it for cheaper than buying the whole thing from eBay or Bricklink provided the set is more than about 10 years old and does not have too many specialty parts.

The Imperial Trading Post was a past set I have resurrected
I am going to look into this and I will let you know if I think it can be done.  If it is possible and I decide to do this I will blog in detail about the process to serve as a rough guide to anyone who would like to try and resurrect a set themselves, the Skulls Eye or other.       

Tuesday, May 31, 2011

Perfecting the Queen Anne's Revenge

If you have purchased 4195 Queen Anne's Revenge, first off major kudos to you, and secondly you may have noticed that while the outside is breathtaking the inside is... a little spartan.  There are a few key features that, in order to meet their price point, Lego omitted from this ship.  I recently set about to see if I could remedy those deficiencies and was very pleased with the result.  So pleased in fact that I can honestly say, with these modifications, the Queen Anne's Revenge is my favorite of all my ships (surpassing even 10210 Imperial Flagship).  To do this I cannibalized 4191 Captain’s Cabin for a few specialized parts and added some extra pieces from my own collection. Here is what I did.

THE FRONT DECK
While the Revenge did improve upon 2009's Brickbeard's Bounty in that it did have a front deck the 2 small pieces Lego included are just not satisfactory considering the ship's  size.  I modeled my improvements off the first Lego pirate ship: 1989's Black Seas Barracuda.  That ship included holds beneath both the front and rear decks accessed by hatches.  I created the same thing here. 


As you can see there are two hinged hatches.  I have extended the deck to just before the first cannon port where I have added a solid wall with a ladder built into it.  I moved the anchor assembly up onto my deck and added a simple locking mechanism using a spare hinge piece.  To round it off I added a few small holders for weapons and called it good.  Nothing I did changed anything about the way the ship is built in the directions, I just filled it in.  A future modification I may try is to make the entire front deck removable and add a furnished crew quarters beneath... we will see.  

THE REAR CABIN
What I felt was the most major deficiency of the Revenge was that its rear cabin was not enclosed.  This has been my biggest pet peeve with all of the smaller Pirate and Imperial Guard ships Lego has produced through the years.  The minute I saw pictures of this set I knew that I would be adding a door to that cabin.  The result is, I feel, a door and facade that blends in perfectly with the rest of the ship making it impossible to tell where the original design ends and the modifications begin.

The 6x4 stud brown plate for the door came from set 4191 The Captain's Cabin.
This is the door assembly up close.

THE REAR DECK
In keeping with what I did in the front I also finished out a small rear deck immediately in front of where the rear cabin attachs.  I added two more hatches to access the space beneath and also a small extension out over the cannon well with a fourth large bone as a rail.  The hatches provide access to the area beneath the rear cabin which the instructions left empty but I finished out as the ship’s galley in a similar manner to the rear of the Imperial Flagship. 

You can see the two hatches with handles next to the support for the mast and
the stove for the galley on the left as well as table and supplies on the right.

MISCELLANEOUS
I incorporated many of the special elements from set 4191 The Captain’s Cabin in various places as well as connecting the front and rear decks on the sides of the cannon well using 3-1x8 peg black plates per side.  The end result is a feel a much more complete set than the original.  I am thrilled with how it turned out.

You can see the 1x8 stud plates that I added here, the ones
on the right end are missing for comparison.

The globe from The Captain's Cabin was a great new piece,
I mounted it near the ships wheel as shown here.
I created detailed instructions for these modifications so they can be recreated the next time I assemble the ship.  If anyone is interested in them let me know and I can send them to you.    

Happy Building
The Lego Chronicler